 Save to Pinterest
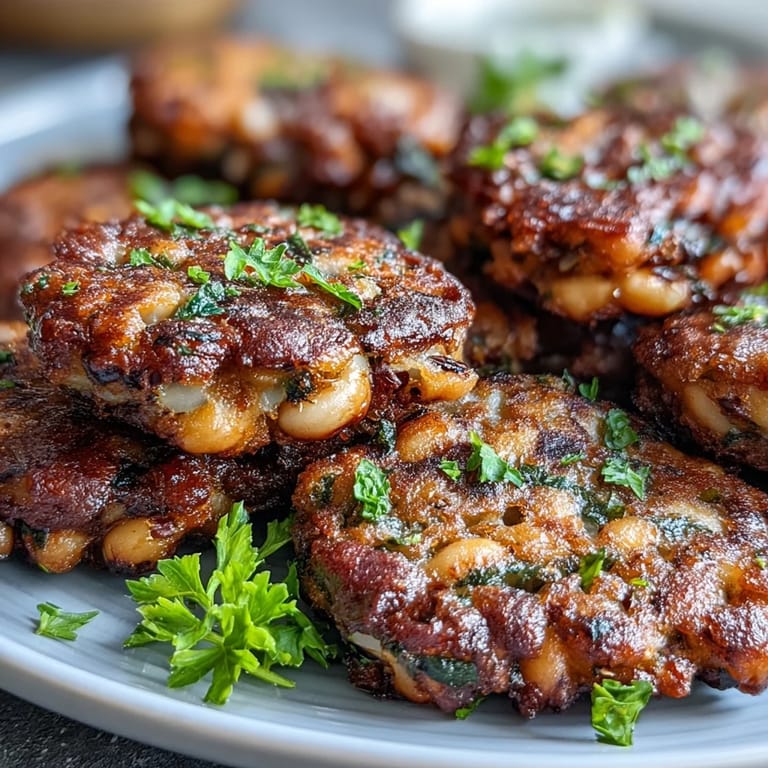
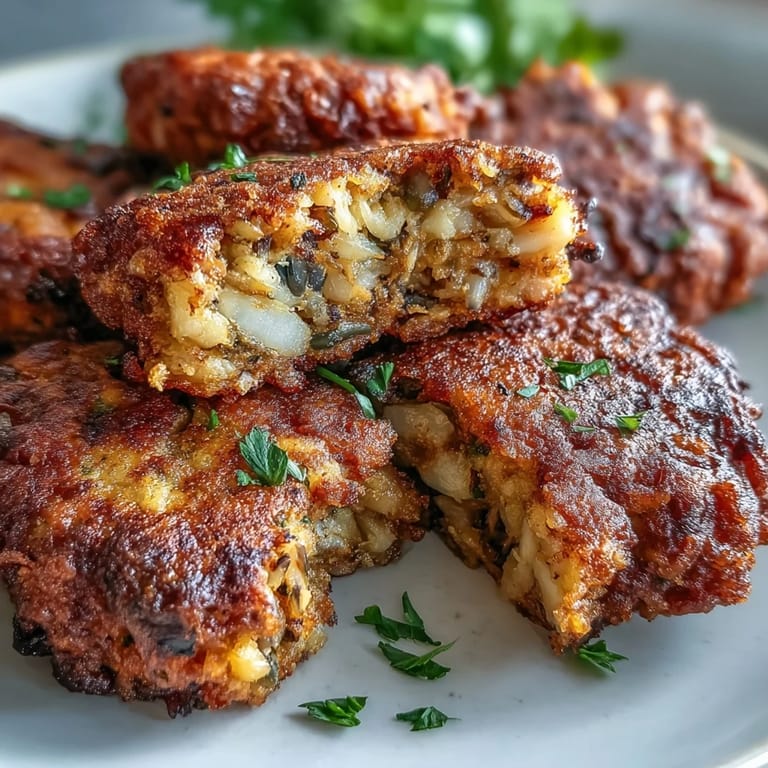
 My neighbor brought a platter of these to a summer porch gathering, and I watched them disappear faster than anything else on the table. The crispy exterior gave way to this warm, creamy center that tasted like home cooking from three generations back. When I finally asked for the recipe, she laughed and said her grandmother made them every week, that black-eyed peas were meant to be fried this way. I've been making them ever since, and they've become my secret weapon for feeding people.
There was this one Tuesday evening when I made a double batch without thinking, and my daughter's three friends showed up unexpectedly. Those fritters became the entire dinner, scattered on plates with different dipping sauces, and nobody complained once. One of them said it was the first time she'd eaten black-eyed peas that didn't feel like "healthy food," and that stuck with me—sometimes the best cooking is just knowing how to make something taste like it was meant to be enjoyed.
Ingredients
- Black-eyed peas, cooked and drained (2 cups): These beans are forgiving and absorb flavor beautifully; canned works just fine if you rinse them well, though I sometimes cook dried ones because the texture feels more intentional.
- Small onion, finely chopped (1): The onion releases its sweetness as it softens in the batter, so don't skip the mincing—it matters for even cooking and flavor distribution.
- Garlic, minced (2 cloves): Fresh garlic wakes up the whole fritter; jarred garlic gets the job done in a pinch, but you'll taste the difference.
- Fresh parsley or cilantro, chopped (2 tablespoons, optional): This is where you add a fresh note that cuts through the richness, and it makes the fritters feel lighter somehow.
- Large eggs (2): These bind everything together and help create that slight creaminess inside while keeping things structurally sound.
- All-purpose flour (3/4 cup): The flour acts as a binder and creates that crispy exterior when it meets the hot oil; don't be tempted to add extra unless the batter feels too loose.
- Salt (1 teaspoon): Salt amplifies the nuttiness of the beans, so taste as you go.
- Ground black pepper (1/2 teaspoon): A small amount gives warmth without overpowering.
- Smoked paprika (1/2 teaspoon, optional): If you use this, you're adding a whisper of smoke and depth that feels sophisticated without being obvious.
- Cayenne pepper (1/4 teaspoon, optional): Even this tiny amount creates a slow-building heat that surprises in the best way.
- Vegetable oil, for frying: Use something neutral with a high smoke point; I learned the hard way that olive oil burns too easily and overpowers the delicate bean flavor.
Tired of Takeout? 🥡
Get 10 meals you can make faster than delivery arrives. Seriously.
One email. No spam. Unsubscribe anytime.
Instructions
- Mash the beans with intention:
- Pour the drained beans into a large bowl and use a fork or potato masher to break them down until mostly smooth but still with some visible pieces. This textural variation is what keeps the fritters from feeling like paste inside.
- Build the batter:
- Add the onion, garlic, herbs, eggs, flour, and all your seasonings to the bowl and fold everything together gently until you have a thick, cohesive mixture. The batter should hold together when you scoop it but still feel slightly loose—if it seems too dry, add water one tablespoon at a time.
- Heat the oil properly:
- Pour about half an inch of oil into your largest skillet and turn the heat to medium, waiting at least three minutes for it to reach the right temperature. You'll know it's ready when a tiny pinch of batter sizzles immediately upon contact.
- Fry with patience:
- Using a spoon or small ice cream scoop, drop heaping tablespoons of batter into the oil, giving each fritter space to breathe—crowding the pan drops the oil temperature and makes them greasy instead of crispy. Flatten each one slightly with the back of the spoon and resist the urge to move them around; let them sit for two to three minutes per side until they're a deep golden brown.
- Drain and serve:
- Transfer the finished fritters to a paper towel-lined plate immediately, which catches the excess oil and keeps them from sitting in their own steam. Serve them warm with whatever sauce calls to you.
 Save to Pinterest
 I remember my son coming home from school one afternoon and eating four of these straight from the plate before saying a word, then asking if we could make them again next week. That's when I realized this simple recipe had quietly become part of how my kitchen feels like a place where people want to linger.
The Best Dipping Sauces
These fritters are sturdy enough to pair with almost anything, but certain combinations feel like they were meant together. A cool yogurt sauce with lime and cilantro cuts through the richness beautifully, while hot sauce brings a sharpness that highlights the beans underneath. I've also had them with mango chutney, which sounds unexpected but creates this sweet-spicy-savory conversation on your palate that feels slightly fancy without being pretentious.
Making Them Ahead
You can prepare the batter up to a day in advance and keep it covered in the refrigerator, which means you can fry these fresh whenever hunger strikes. The cooked fritters themselves stay best eaten the same day, but they reheat surprisingly well in a 350-degree oven for about five minutes if you need a quick snack the morning after.
Variations Worth Trying
Once you understand how these fritters work, you'll start seeing endless possibilities in your pantry. I've added scallions for an oniony brightness, stirred in a pinch of cumin for earthiness, and even used chickpea flour in place of all-purpose for a slightly different texture that feels almost more authentic. The foundation is so flexible that you can follow your instincts and the season.
- Try adding finely minced bell pepper for sweetness and color without changing the cooking time.
- Substitute half the all-purpose flour with chickpea flour if you want a gluten-free option that actually tastes better, in my opinion.
- If you're out of fresh herbs, dried parsley works fine—just use about a third of the amount since dried is more concentrated.
 Save to Pinterest
 These fritters are the kind of recipe that proves the best food is often the simplest, built on a foundation of good ingredients and the willingness to let them speak for themselves. Make them once and you'll understand why my neighbor's grandmother kept making them every week.
Common Recipe Questions
- → Can I use canned black-eyed peas?
Yes, canned black-eyed peas work perfectly. Drain and rinse them thoroughly before mashing. You'll need about two 15-ounce cans to equal 2 cups of cooked peas.
- → How do I make these gluten-free?
Substitute the all-purpose flour with chickpea flour or a gluten-free flour blend. The texture remains excellent, and chickpea flour actually enhances the flavor profile.
- → Can I bake these instead of frying?
Yes, brush a baking sheet with oil and shape the batter into patties. Bake at 400°F for 15-20 minutes, flipping halfway through. They won't be quite as crispy but still delicious.
- → How should I store leftovers?
Store cooled fritters in an airtight container in the refrigerator for up to 3 days. Reheat in a 350°F oven for 10 minutes to restore crispiness. They freeze well for up to 2 months.
- → What dipping sauces pair well?
These fritters shine with yogurt dip seasoned with herbs, spicy hot sauce for heat, or sweet mango chutney for contrast. A simple garlic aioli or remoulade also works beautifully.
- → Can I add other vegetables?
Absolutely. Finely diced bell peppers, corn kernels, or grated carrots add color and nutrition. Just keep pieces small so they cook through evenly during frying.