 Save to Pinterest
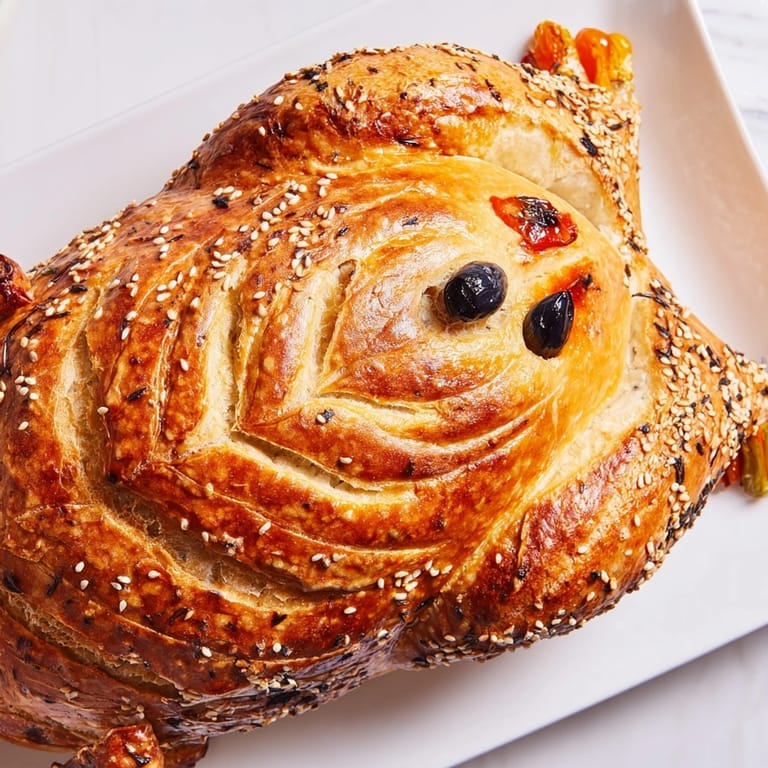
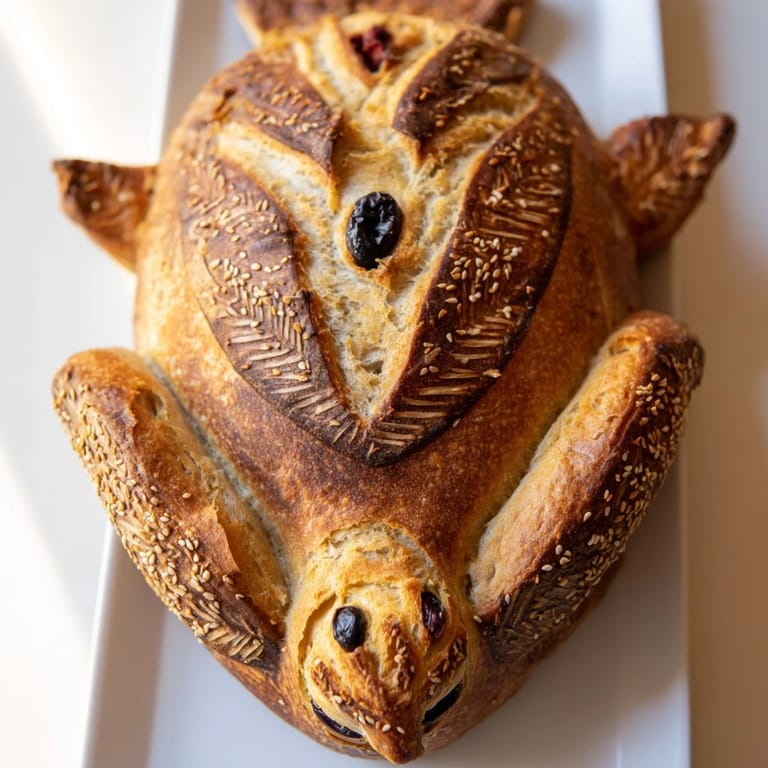
 The oven timer buzzed just as my neighbor peeked through the kitchen window, drawn by the smell of baking bread. She gasped when I pulled out what looked like a golden, crusty bird perched on parchment paper. I'd spent the better part of a day nursing my sourdough starter and shaping dough into something that belonged on a Thanksgiving table, not in my usual weeknight rotation. The kids circled like hawks, arguing over who got to place the olive eyes. It wasn't perfect—one wing sat a little crooked—but it was ours, and it smelled like every holiday memory rolled into one loaf.
I first made this loaf the year we hosted Thanksgiving for the first time, panicking because I'd forgotten to buy dinner rolls. My sourdough starter sat bubbling on the counter, so I figured why not try something bold. I sketched a turkey shape on scrap paper, divided the dough with shaky hands, and prayed it wouldn't collapse in the oven. When it emerged puffed and bronzed, my mother-in-law actually clapped. That loaf bought me years of credibility I hadn't earned yet.
Sourdough baking taught me that time is an ingredient you can't skip or substitute. This turkey bread asks for patience: a long bulk ferment, gentle shaping, and a slow proof. The payoff is a crust that shatters when you tear into it and a crumb that's airy but never dry. Every fold, every rest, every scored feather detail builds flavor you can taste in every bite.
Ingredients
Tired of Takeout? 🥡
Get 10 meals you can make faster than delivery arrives. Seriously.
One email. No spam. Unsubscribe anytime.
- Bread flour: High protein content gives structure and chew, essential for a loaf that holds its turkey shape without sagging.
- Water: Room temperature water keeps fermentation steady and predictable, avoid cold water or your dough will move too slowly.
- Active sourdough starter: Feed it 4 to 6 hours before mixing so it's bubbly and doubles when you stir it, that's when it has the most lift.
- Fine sea salt: Strengthens gluten and balances the tang, add it after autolyse so it doesn't inhibit fermentation early on.
- Black olives or peppercorns: Peppercorns stay put better than olives and won't leak brine onto your golden crust.
- Red bell pepper or dough: A tiny scrap of pepper looks more realistic than dough, but dough bakes right in and won't shrivel.
- Additional flour: Dust your work surface lightly, too much and your dough won't stick to itself when you assemble the turkey.
- Egg: Brushing with beaten egg gives a glossy, bakery-style finish, but plant milk works nearly as well for a vegan shine.
- Seeds: Poppy or sesame seeds mimic feather texture beautifully and add a subtle crunch to each slice.
Instructions
- Start the autolyse:
- Stir flour and water together until no dry pockets remain, then cover the bowl with a damp towel. This rest lets the flour fully hydrate and makes gluten development easier later.
- Add starter and salt:
- Squish the sourdough starter and salt into the dough with wet hands, folding and pinching until everything disappears into a shaggy mass. It'll feel sticky and unruly at first.
- Stretch and fold:
- Every thirty minutes, wet your hand, grab one edge of the dough, stretch it up, and fold it over itself, rotating the bowl as you go. After three or four rounds, the dough will feel smoother and hold its shape better.
- Bulk ferment:
- Leave the covered bowl in a warmish spot until the dough doubles in volume and you see bubbles through the side if your bowl is clear. In a cool kitchen this can take seven hours, so plan accordingly.
- Shape the pieces:
- Turn the dough onto a floured counter and divide it: one large oval for the body, a golf ball-sized round for the head, and several small teardrops for wings and tail feathers. Handle gently so you don't deflate all those bubbles.
- Assemble the turkey:
- Lay parchment on a baking sheet, center the body oval, dab the top with water, and press the head on. Fan out feathers behind the body and tuck wings alongside, using water as glue wherever pieces meet.
- Score and decorate:
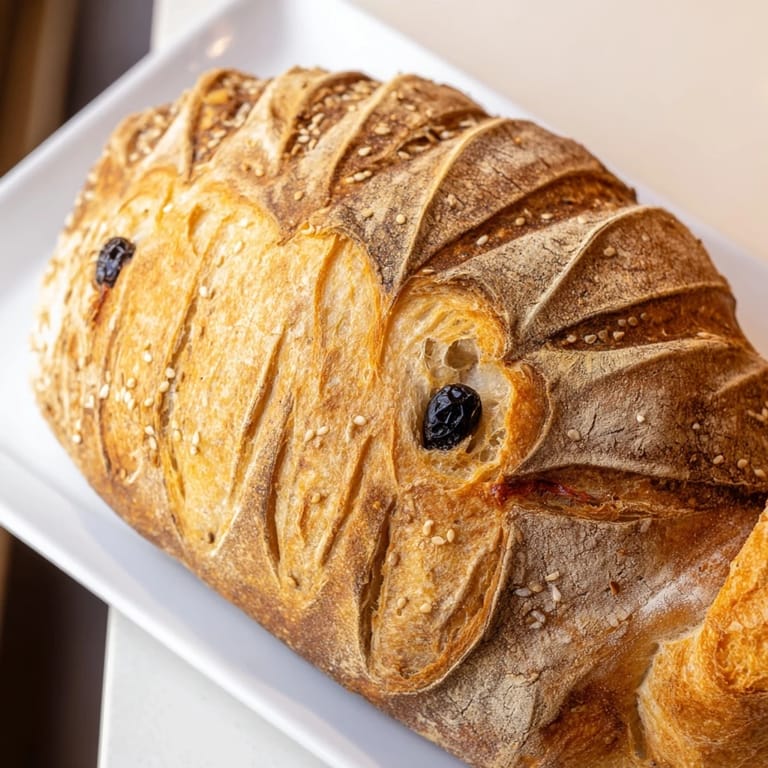
- Use a sharp knife or lame to draw feather lines into each piece, cutting shallow so they open beautifully in the oven. Press olive halves or peppercorns in for eyes and nestle a sliver of red pepper where the wattle should go.
- Proof:
- Cover loosely with a towel and let rest until the dough looks puffy and a gentle poke leaves a slow-filling dent. This usually takes an hour or two depending on room temperature.
- Preheat with steam setup:
- Slide your baking stone or steel into the oven and crank it to 230 degrees Celsius. Place an empty metal pan on the bottom rack for steam later.
- Apply egg wash and seeds:
- Brush the entire turkey with beaten egg or plant milk, working carefully around the decorations. Sprinkle seeds over the feathers and wings for texture.
- Bake with steam:
- Slide the parchment and turkey onto the hot stone, pour half a cup of water into the bottom pan, and quickly close the door. After twenty minutes, lower the heat to 200 degrees Celsius and bake another twenty until the loaf sounds hollow when tapped underneath.
- Cool completely:
- Transfer to a wire rack and resist slicing for at least an hour. The crumb is still setting, and cutting too early will leave you with gummy insides.
 Save to Pinterest
 The year my daughter insisted on helping, she pressed raisins into the dough for eyes before I could stop her. They shriveled into tiny dark pits that looked vaguely haunted, but she was so proud we served it anyway. Everyone laughed, and someone dubbed it the Zombie Turkey. It became our tradition to let the youngest person add the eyes, no matter how weird the result. That loaf taught me perfection is overrated when you're making memories.
How to Tell When Your Dough Is Ready
Sourdough doesn't follow a strict clock, it follows temperature and feel. During bulk fermentation, look for a dough that's doubled, jiggles when you shake the bowl, and shows visible bubbles on the surface and sides. When you poke it gently with a floured finger, it should spring back slowly but leave a slight dimple. If it springs back immediately, give it more time. If it doesn't spring at all, you might have let it go too long, but don't panic, it'll still bake into something delicious, just a little denser.
Storing and Serving Your Turkey Loaf
Once fully cooled, wrap the loaf loosely in a clean kitchen towel or place it in a paper bag to keep the crust crisp. It'll stay fresh on the counter for three days, though the crust softens after the first day. If you need to keep it longer, slice and freeze individual portions in a zip-top bag, then toast straight from frozen. Serve it as a centerpiece on a wooden board with butter, olive oil, or alongside a big pot of soup. The best part is tearing into it together, everyone pulling off a feather or wing and discovering that tangy, chewy crumb.
Troubleshooting and Tweaks
If your turkey comes out pale, your oven might run cool, so use an oven thermometer next time and adjust the dial. A dense crumb usually means under-fermentation, so extend your bulk rise or find a warmer spot. If pieces fall off during baking, you didn't use enough water to stick them together, or the dough was over-proofed and too slack. For extra flavor, try folding in fresh rosemary or thyme during the stretch and folds, or brush with garlic butter right when it comes out of the oven.
- Use a spray bottle for steam if you don't have a metal pan, just spritz the oven walls quickly before closing the door.
- Shape a practice turkey with playdough or clay first if you're nervous about the design.
- Score deeper into thicker parts like the body so they expand evenly with the thinner feathers.
 Save to Pinterest
 Every time I pull this loaf from the oven, I'm reminded that bread baking is equal parts science and play. It's okay if your turkey looks goofy or lopsided, it'll taste incredible and make people smile, and that's the whole point.
Common Recipe Questions
- → How long does fermentation take for this sourdough?
The dough requires an initial 30–45 minute autolyse, followed by 5–7 hours of bulk fermentation at room temperature (21–23°C). After shaping, allow 1–2 hours for final proofing before baking. Total time from start to finish is approximately 11–13 hours.
- → Can I make this vegan?
Yes, this sourdough is naturally vegan. Skip the egg wash or substitute it with plant-based milk for shine. All ingredients are plant-derived, including the sourdough starter, flour, water, and salt. Optional toppings like seeds are also vegan-friendly.
- → What's the purpose of stretch and folds in this dough?
Stretch and folds strengthen the gluten network without intensive kneading. Perform 3–4 sets every 30 minutes over 2 hours during bulk fermentation. This technique builds dough structure, improves elasticity, and develops the characteristic open crumb typical of artisan sourdough.
- → How do I create defined feather details on the turkey?
After assembling your shaped dough pieces, use a sharp knife or bread lame to score feather patterns into the bread surface. These cuts expand during baking, creating visual definition. You can also sprinkle poppy, sesame, or flax seeds on the scored areas for added texture and detail.
- → Why is steam important during baking?
Steam during the first 20 minutes of baking keeps the dough surface moist, allowing maximum oven spring and expansion. This creates the desirable crusty exterior characteristic of artisan sourdough. Use a baking stone preheated in a hot oven and place a water-filled pan at the bottom rack to generate steam.
- → How can I enhance the flavor of this loaf?
Mix fresh or dried herbs like rosemary or thyme into the dough during the mixing stage. These aromatic additions complement the tangy sourdough starter's natural flavor. Alternatively, brush the baked loaf with herb-infused oil after cooling for an extra flavor boost.