 Save to Pinterest
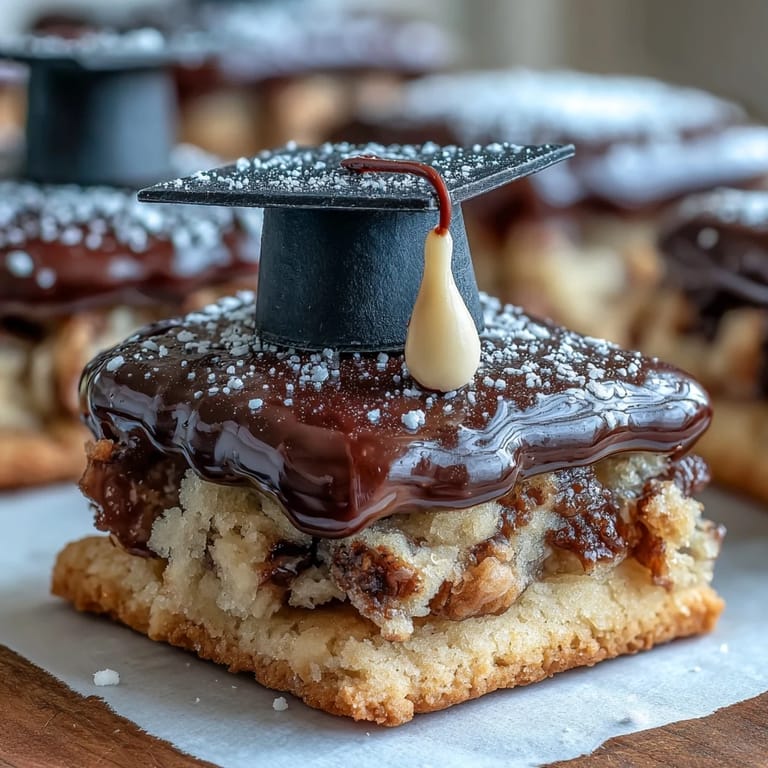
 My neighbor's daughter was graduating, and I wanted to make something that felt celebratory but wouldn't stress me out in the kitchen. These sugar cookies with fondant mortarboards came to me one evening while I was scrolling through old graduation photos, thinking about how quickly time flies. The moment I realized I could combine a simple cookie with a playful fondant decoration, I knew I had found the perfect gift. There's something about edible celebration wear that makes people smile, especially when they're dressed up for such a big moment.
I'll never forget watching my coworker's face light up when she opened the box of cookies I'd brought to her daughter's graduation party. She bit into one and immediately showed three other parents, and within minutes they were asking for the recipe. What started as a quiet project in my kitchen became a conversation starter at the celebration, and that's when I realized these weren't just cookies—they were tiny edible congratulations messages.
Ingredients
- All-purpose flour: The foundation of everything, and using the right amount matters more than you'd think—I weigh mine now rather than scooping because it prevents dense cookies.
- Baking powder: Just enough to give the cookies a tender crumb without making them cake-like, which is exactly where the magic lives.
- Salt: Balances the sweetness and makes you realize salt belongs in desserts just as much as it does in dinner.
- Unsalted butter: Softened butter creams into a fluffy base that holds together better than cold butter ever could.
- Granulated sugar: Creates structure in the dough and caramelizes slightly at the edges, giving you those delicate golden borders.
- Egg: Binds everything together while adding richness, and bringing it to room temperature helps it incorporate smoothly.
- Pure vanilla extract: Two teaspoons might seem like a lot, but it's what makes people ask what makes these taste so good.
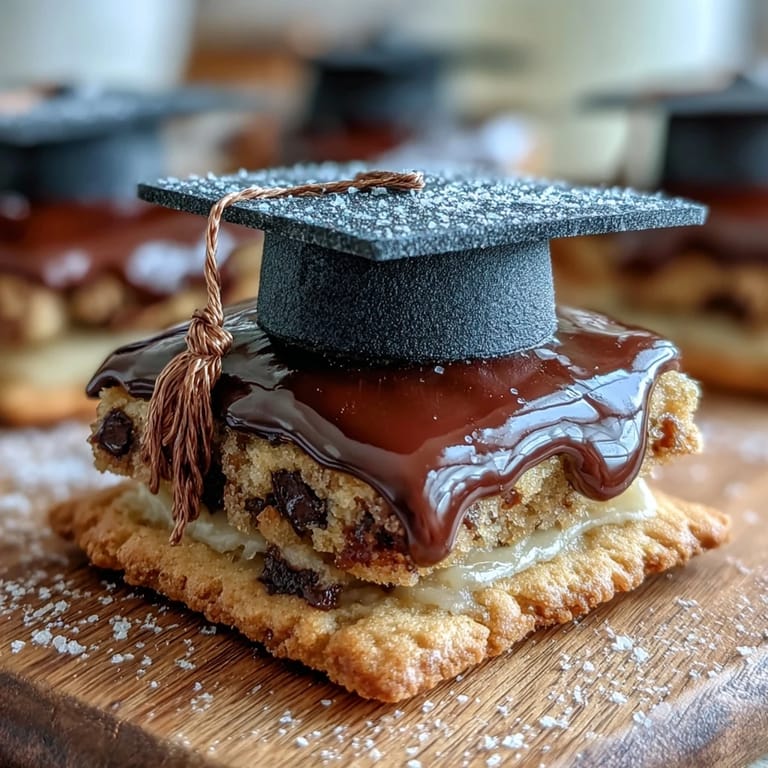
- Black fondant: The star of the show—eight ounces is enough for 24 mortarboards, and it's more forgiving to work with than you'd expect.
- Yellow fondant: Just a touch for the tassel, and you can swap in any color that matches your graduate's school or preference.
- Cornstarch: Your best friend when rolling fondant so it doesn't stick to everything.
- Powdered sugar icing: Acts as both glue and finishing touch, holding your decorations in place while keeping the cookie itself crispy.
Tired of Takeout? 🥡
Get 10 meals you can make faster than delivery arrives. Seriously.
One email. No spam. Unsubscribe anytime.
Instructions
- Prep your workspace:
- Preheat the oven to 350°F and line two baking sheets with parchment paper. This might seem like the boring part, but it's what stops you from panicking when the dough is ready to bake.
- Make the dry mix:
- Whisk together flour, baking powder, and salt in a medium bowl. Whisking instead of just stirring ensures everything is evenly distributed, which matters more than it sounds.
- Cream the butter and sugar:
- In a large bowl, beat softened butter and sugar together for about two to three minutes until it looks light, fluffy, and almost cloud-like. You'll know you're there when it's noticeably paler than when you started.
- Add the wet ingredients:
- Beat in the egg and vanilla extract until everything is combined and smooth. This is when your kitchen starts smelling like vanilla in the best possible way.
- Bring it together:
- Gradually add the dry ingredients to the wet mixture, mixing just until incorporated and no flour streaks remain. Stop as soon as you see no flour—overworking makes tough cookies, which is never what you want.
- Roll and cut:
- Roll the dough out on a lightly floured surface to about 1/4-inch thickness, then cut into 2 1/2-inch rounds or squares. The shapes can be imperfect and it honestly looks more charming that way.
- Bake:
- Place cookies on the prepared baking sheets and bake for 10 to 12 minutes until the edges are just starting to turn golden. The centers will still look slightly underdone, which is the secret to keeping them tender.
- Cool completely:
- Let cookies cool on the baking sheets for a minute, then transfer to a wire rack. Cooling completely is essential before decorating or the fondant will slide right off.
- Prep the fondant mortarboards:
- Roll black fondant to about 1/8-inch thickness and cut out 24 small squares (roughly 1 1/4 inches) for the mortarboard tops. Then roll 24 small cylinders about 1/2-inch long for the base of each hat.
- Make the tassels:
- Roll yellow fondant into thin ropes and cut into 1-inch pieces, then shape them however you like—a little loop, a tight curl, or just a dangly piece all work beautifully.
- Mix the icing:
- Combine powdered sugar, milk, and vanilla extract until you have a smooth, spreadable consistency. Add milk a little at a time so you can control how thick it is.
- Decorate each cookie:
- Use icing to attach a fondant square in the center of each cookie, then place a fondant cylinder underneath as the base. Add a dab of icing to attach the yellow tassel to one corner of the mortarboard.
- Let everything set:
- Give the decorations 20 to 30 minutes to firm up before serving or packing them away. This prevents the mortarboards from sliding around.
 Save to Pinterest
 The best part wasn't just that the cookies tasted incredible, but that they became something people wanted to preserve for a moment before eating them. Someone actually took a photo before biting in, and that's when I realized I'd created more than a treat—I'd made a tiny, edible piece of someone's big day.
Customizing Your Mortarboards
School colors make these cookies feel extra personal, and fondant is surprisingly easy to color with just a drop or two of gel food coloring. I've made red and gold for one celebration, royal blue and white for another, and each time they felt like they were made specifically for that moment. You can also swap the tassel color, add school initials if you're feeling ambitious, or even use different cookie shapes like squares to match the mortarboard theme perfectly.
Storage and Gifting
These cookies actually stay fresh for up to five days in an airtight container, which means you can make them well ahead of the celebration and store them at room temperature without any worry. If you're gifting them, a pretty box with parchment paper between layers keeps them looking Instagram-worthy all the way to their destination. I've wrapped individual cookies in tissue paper for elegant single gifts, and I've also stacked them in clear bags tied with ribbon for something that looks both thoughtful and celebratory.
Quick Shortcuts and Honest Alternatives
If you're short on time or want to simplify the process, store-bought sugar cookie dough and pre-colored fondant are genuinely good options that don't sacrifice the final impression. Pre-made fondant comes in every color imaginable, so you skip the step of coloring it yourself, and store-bought dough means you go straight to cutting and baking. The real work and creativity still comes from the decoration, and that's what people remember anyway.
- You can make these cookies a day ahead and refrigerate them, then decorate them the morning of the party for a much more relaxed timeline.
- If fondant intimidates you, royal icing piped to look like a cap works beautifully as a backup decoration method.
- Keep extra fondant in an airtight container—it stays fresh for months and is ready whenever inspiration strikes next.
 Save to Pinterest
 These cookies are proof that thoughtful celebration doesn't require complicated techniques or hours of stress. They're a reminder that the most meaningful gifts are often the ones made with your own hands, even if your mortarboards are a little wonky or your tassel placement isn't perfect.
Common Recipe Questions
- → What type of flour is best for these cookies?
All-purpose flour works well, providing the right structure and tenderness for a classic cookie texture.
- → How can I work with fondant for the decorations?
Roll fondant thinly on a surface dusted with cornstarch to prevent sticking, then cut shapes and form tassels before attaching them with a light icing.
- → Can these cookies be made ahead of time?
Yes, cookies and decorations can be prepared in advance, stored airtight for up to 5 days to maintain freshness.
- → What alternatives can be used for dietary restrictions?
Use gluten-free flour, dairy-free butter, and egg substitutes as needed, and verify fondant ingredients to avoid allergens.
- → How do I ensure cookies bake evenly?
Roll the dough to uniform thickness and place cookies evenly spaced on parchment-lined sheets before baking at 350°F.